
Looking at the Google search results, you could be forgiven for thinking that app design and app development are synonyms. But, in reality, they're two distinct concepts.
Whereas app development refers to the overall process of building an app, app design concerns the overall look and feel.
So when you come across an app where your eyes are glued to your smartphone, that’s app design elements like user interface (UI) and user experience (UX) doing their magic. This is backed up by research with 94% of first impressions being design-related.
If you want to know how to design your own app and don’t know where to start, this guide is for you. We’ll begin with the basics before delving into who provides app design services and how you can take on an app design project yourself.
By the end of this guide, you’ll learn important rules you need to keep in mind while designing your app and understand how important design is to your app's success.
Let’s go 👇
Understanding the basics of app design
Here are the key components of app design you should know about:
What is app design?
App design refers to the creative process of conceptualising, planning and creating the user interface (UI) and user experience (UX) of a mobile app. Simply put, it’s the process of creating a great look and feel that matches your business objectives.
In the app design process, the design team makes the decision about the layout, typography, colours, fonts and elements of the app so that it’s both aesthetically pleasing and easy to use.
While designing an app, you should strive to create an engaging user interface that guides users seamlessly through the app’s features, thereby enhancing user experience.
What is the app user experience (UX)?
App user experience, commonly referred to as app UX, encompasses the overall interaction and satisfaction a user derives from using an application.
It includes every aspect of the user's engagement with the app, from downloading and installing it to exploring its features and functionalities. A positive app UX for mobile users focuses on building a user-centric design that’s intuitive, accessible and efficient, resulting in increased user engagement and retention.
Don Norman, the man who coined the term “user experience” back in 1993 while working at Apple, put it like this:
“They think the experience is that simple device; that website or app. No, it’s everything. It’s the way you experience the world, it’s the way you experience your life and it’s the way you experience the service, or yeah, an app. But it’s a system that’s everything.”
What is the app user interface(UI)?
App user interface (UI) design is a part of app UX and encompasses the visual and interactive elements through which users engage with an application. Here, psychology, design and technology are combined to create an interface that’s not only visually appealing but also user-friendly and functional.
App UI has two main concerns. First is the usability of your app: making your design unintrusive, actions predictable, putting buttons in sensible places, making things happen with fewer clicks and ensuring it’s obvious what to do next.
Secondly, it’s about making your app design enjoyable to use, predicting what your users want to do next and making that process seamless.
How do you design an app from scratch?
Now that you know the basics of app design, let’s dive into the app design process. In this section we’ll cover everything from the pre-design phase and design planning to wireframe, mockup and prototype creation. 👇
Step #1 - Pre-design phase
Just like you would before developing an app, you need to do the following before designing an app:
- Identify your target audience
- Define the problem you’re trying to solve and the outcomes you’re trying to enable
- Conduct a competitive analysis
All of this information is key to creating an app that meets user expectations and ensures your app achieves its goals. For example, if you’re building an ecommerce app, your business and user goals could look like this:
Business goal: Create a profitable online business by driving sales and revenue.
User goal: Create a platform where users get a seamless shopping experience.
Then, by researching your competitors, you’ll learn what they do well and what they do badly in terms of app design and overall user experience.
You can feed this into your own design and development processes, ensuring that you have a competitive advantage. In other words, a unique selling point (USP).
Step #2 - Design planning
Now that you’re clear about what you want, it’s time to start planning what your app will look like. The first step in designing your app is to think about the must-have features for a minimum viable product (MVP).
This is the very first version of your app that is usable but has the primary purpose of serving as a platform for future design and development.
Each app will have a different set of key features. For instance, a restaurant app must have a table reservation and menu feature, whereas an ecommerce app needs a product catalogue and shopping cart feature.
The table below highlights what features the MVP of an ecommerce app should have, as well as the ones it could have once you’ve found your product-market fit:
Must-have features for MVP | Nice-to-have features |
User login | Social media integration |
User profile | Data analytics |
Product catalogue | Personalisation |
Search and filters | |
Reviews and ratings | Loyalty programs |
Multiple payment options | Chat |
Now, it’s time to think about the structure of your app and create a user flow for your app.
What is user flow?
In app design, a user flow refers to the series of steps that your user follows while interacting with your app to complete a specific task. They illustrate the journey of your user through the app, mapping out a sequence of screens and actions they make along the way. 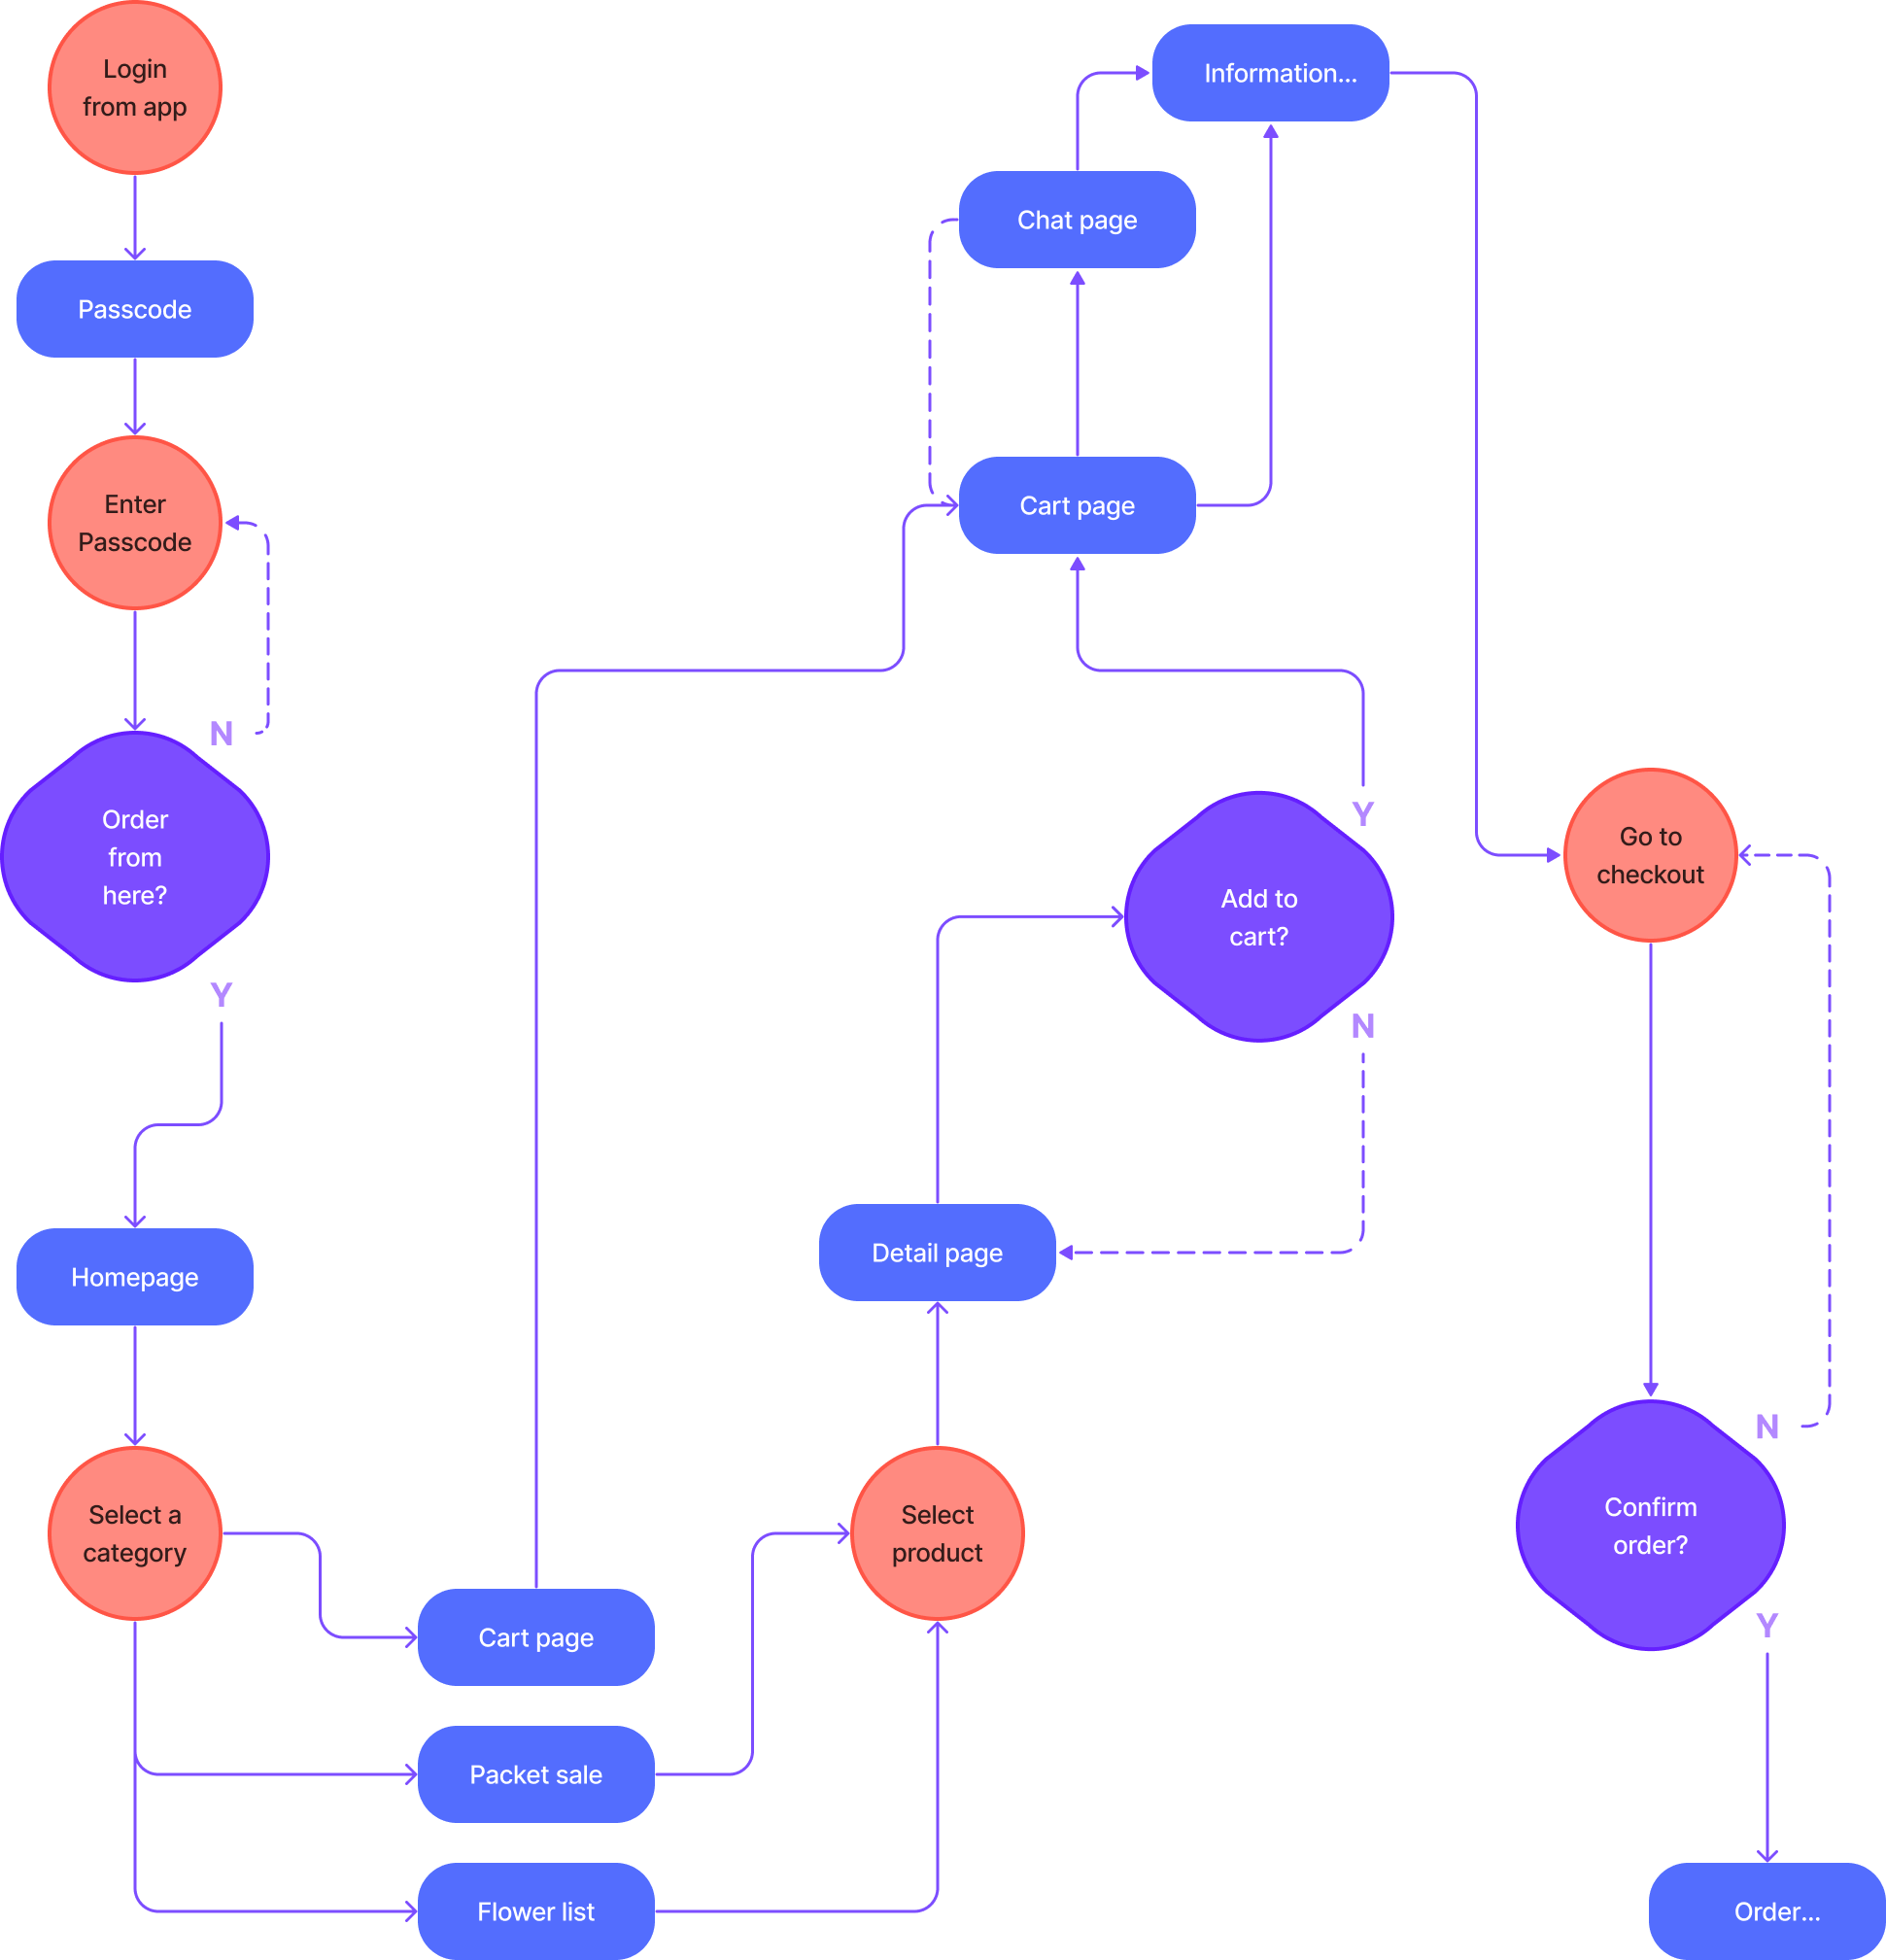
It's during the designing of user flow that you:
- Identify the entry pointswhere users start their journey, such as a home screen or a notification
- Map screen transitions to illustrate the connection between screens and interface elements
- Account for decision points where users must make a range of choices, such as selecting product variants, adding to a cart or choosing payment methods
- Optimise for efficiency by streamlining the user journey and minimising unnecessary steps
User flow is crucial because only after creating user flow can you create wireframes, mockup and prototypes.
Step #3 - Create wireframe, mockup and prototypes
Now that you've planned all the essential features and designed the user flow of the app, it’s time to move onto the more interesting phase of app design: wireframing, mockups and prototyping. Let's take a closer look:
Wireframe | Mockup | Prototype | |
Description | Rough layout or blueprint | Detailed visual representation | Interactive, functional model |
Objective | To do structural planning of the app layout | To finalise visual design | To test user interactions with the app |
Interactivity | None | None | Interactive |
Development stage | Early stages of design | Intermediate stage of design | Final stage before coding |
Time and cost | Quick and cost-effective | Moderate time and cost investment | Higher time and cost investment |
What is wireframing?
Wireframes serve as a skeletal blueprint of your app design that outlines the layout, structure and functionality of your app’s screen and features.
The process depicts the app’s UI, including app layout designs, page layout designs, elements like buttons, visuals and text and screen connections.
Wireframing is an important step as it helps you visualise how your app will look before delving into the actual app design and coding. It also helps you find inconsistencies in the app structure so that you can rearrange and refine it.
You can create wireframes using platforms such as InVision, Figma, AdobeXD, Axure and many others.
It’s important to note that wireframing doesn’t convey the colours and designs of a screen and is mere schematics and structure of your app. To depict designs or the final version of how the app looks, you need to create app mockups.
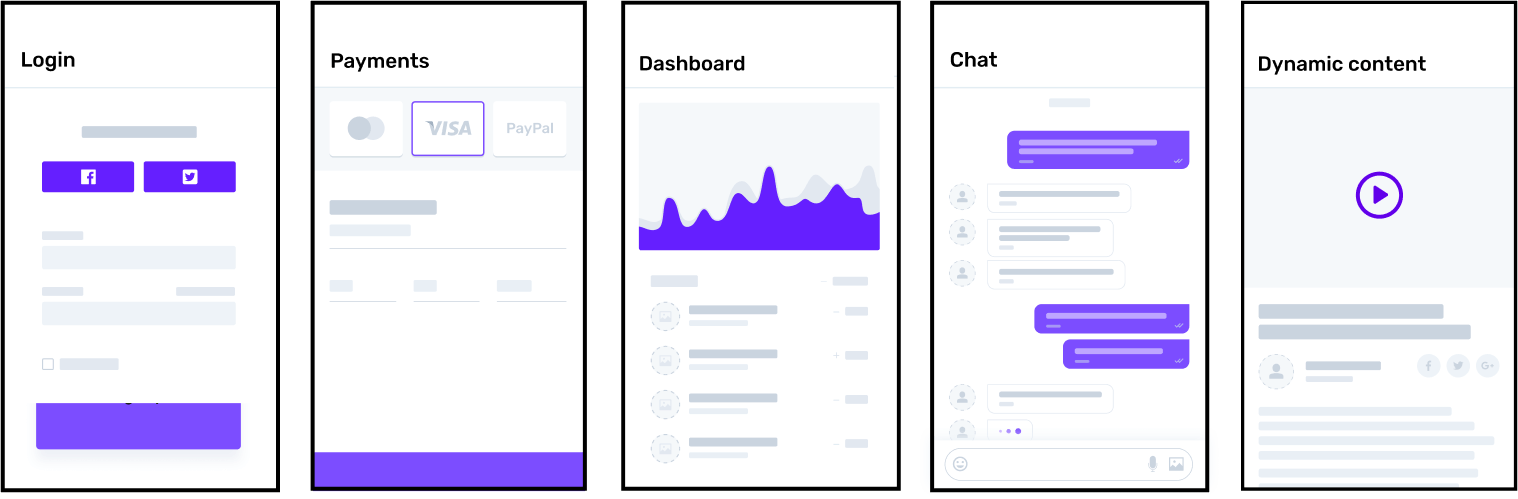
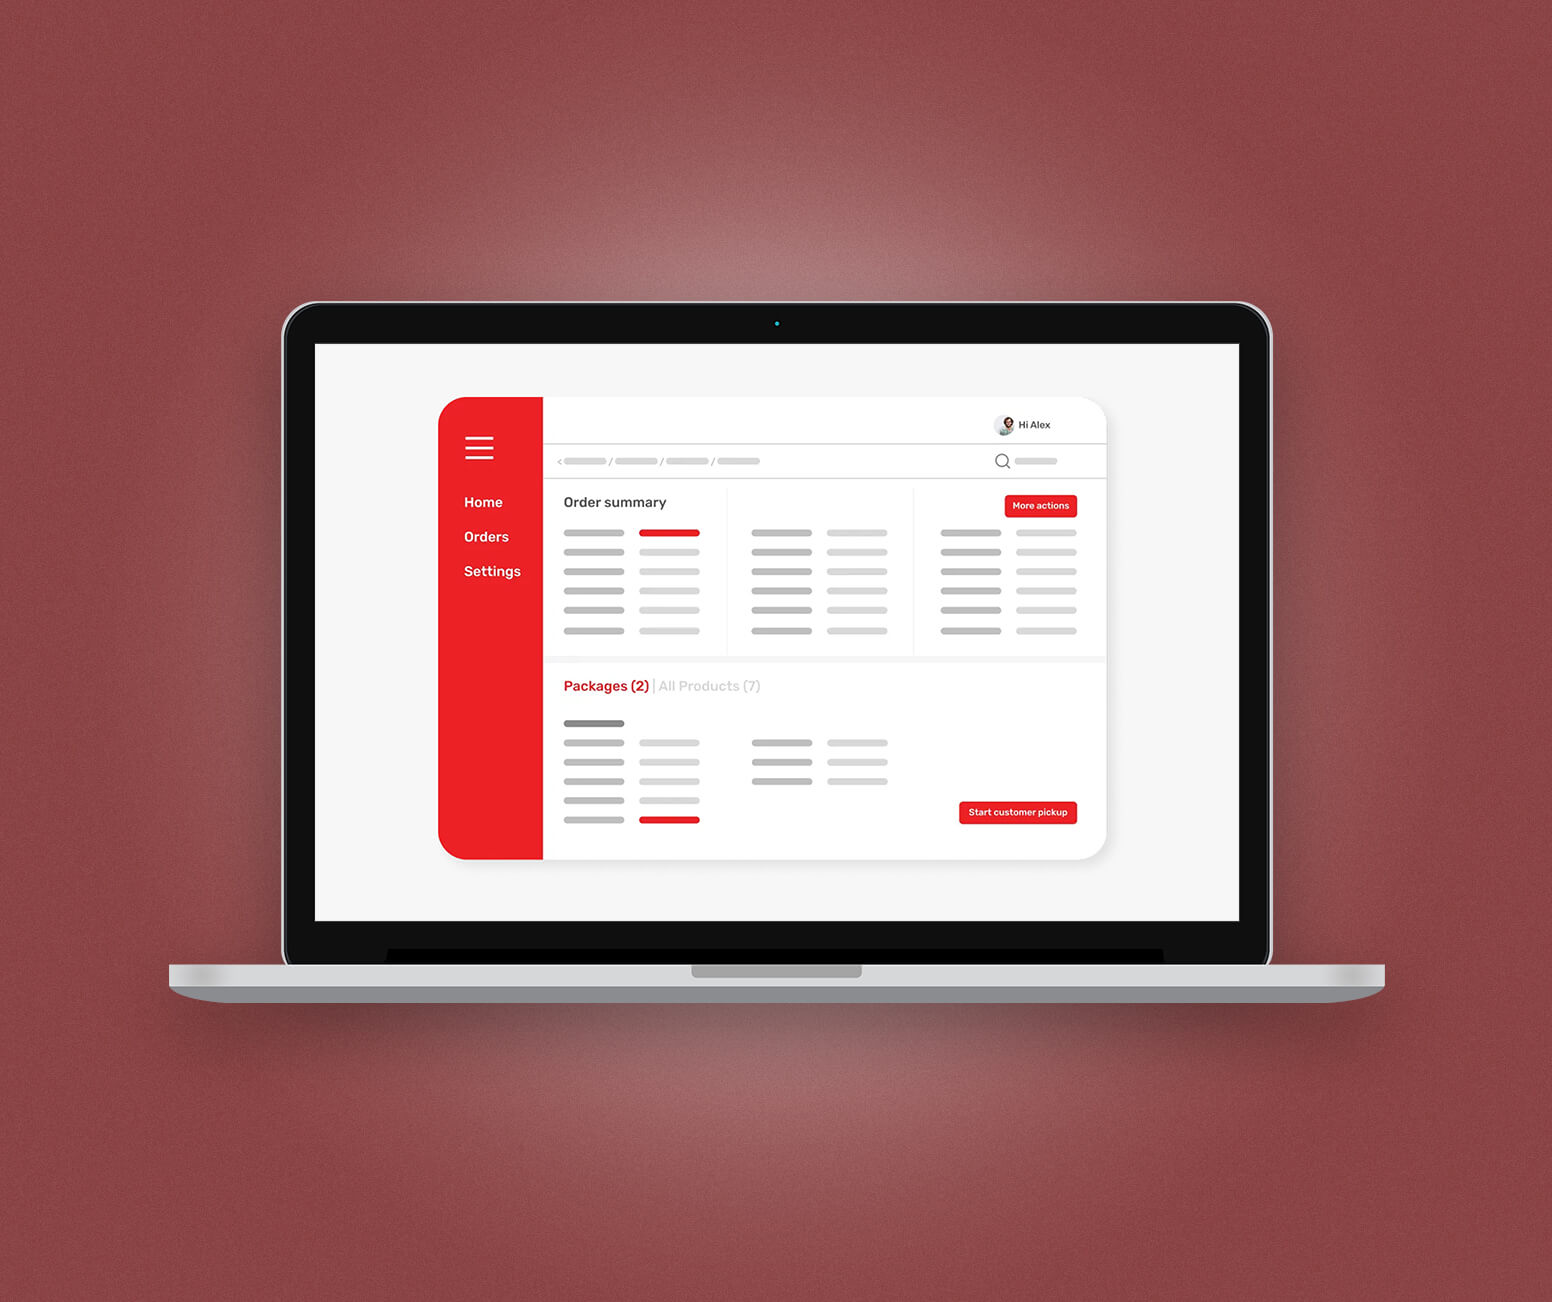
What are mockups?
An app mockup is a visual representation of your app's design. It's essentially a screenshot of your app's layout, user interface and overall design elements, but doesn't have any functionality.
While creating an app mockup, you need to think about fonts, colour palette, white spaces, content layout, typography and everything visual.
They’re different from wireframes as they contain more stylistic UI details and show how your app will look after production. App mockups help you, designers and developers visualise the app's appearance and make necessary changes before diving into the actual mobile app development process.
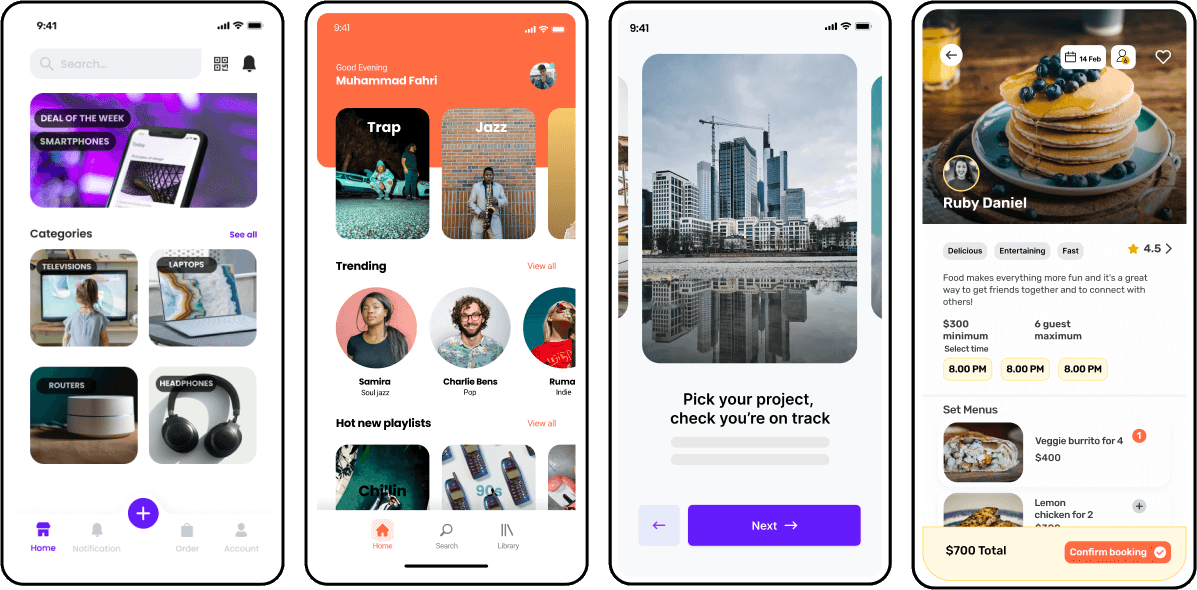
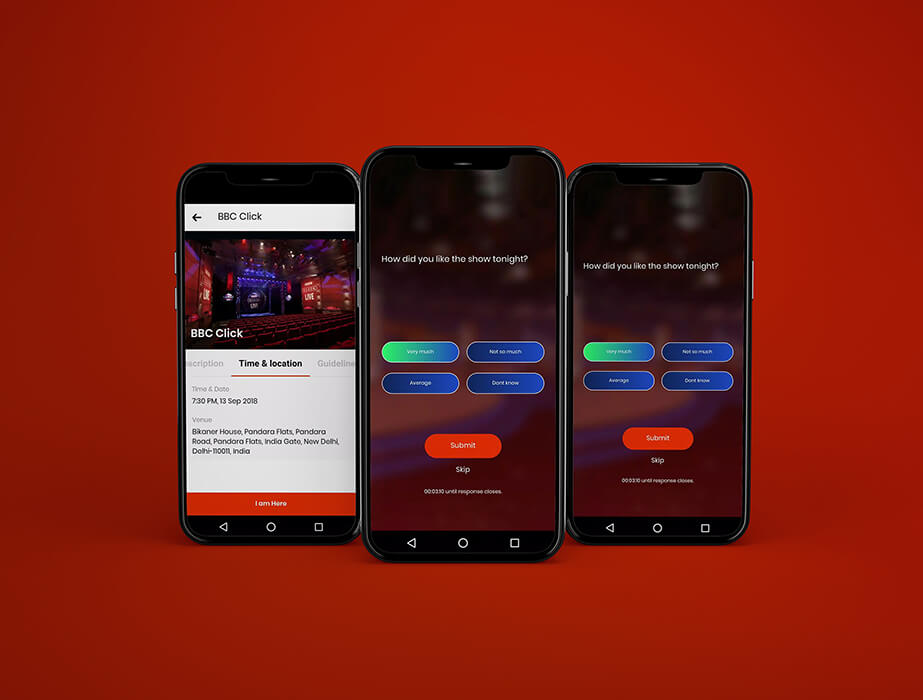
What is an app prototype?
Now that you know how your final app is going to look, it’s time to finally develop your app prototype.
A prototype is a fully functional interactive mockup that has clickable features and looks similar to the final product. It’s one step ahead of the app mockup that combines both the UI and UX elements of your app.
Where mockups give you the “look” of the final product, prototypes allow you to experience and get the “feel” of the final product.
To design a prototype, you need to assemble all the mockups in graphic software like Figma, AdobeXD or others. Here, you can switch between the app screens by clicking on elements.
After prototyping, you should start creating your app by handing over the design to the development team.
But that doesn’t mean you should forget about app design:
This is a process you should review continuously and especially when you add new features. As a result, it’s always recommended that you work with a reliable design partner. Let's take a look at different routes you can take to get your app designed.
App design routes
If you have design skills, then we wish you all the best and recommend you jump to the next section of “design rules”.
But if you aren’t going to design your app yourself, it’s important that you find a reliable partner that you can trust and go back to for help in future.
There are essentially four available options if you wish to get your app designed. You can onboard:
- A freelance designer
- An in-house design team
- An external design agency
- An app builder to design and develop your app from start to finish
Here’s how they compare in brief:
Freelance designer | Design agency | In-house design team | App builder | |
Expertise | Low - medium | High | High | High |
Communication | Limited - average | Average | Good - great | Good |
Project Timeline | Very slow - slow | Slow - medium | Slow - medium | Fast |
Complexity | Low | Medium - high | High - very high | Low - high |
Cost | Low | High | Very high | Low - high |
Control over design | Limited | Limited | Full | Full |
Now, let’s take a deep dive into each route individually 👇
Route #1 - Hire a freelance designer
Sites like Upwork and Fivver make it easy to find individual freelancers with the skillset you’re looking for. These marketplaces allow previous customers to rate the freelancer, which means you’ve got an idea of their skill level.
When working with freelancers, there are a few things you need to consider. For example, time zone differences and communication outages could make it challenging to stick to a rigid project schedule.
Meanwhile, as freelancers don’t have a team to call on, their ideas will come from a singular perspective, rather than going through a robust quality assurance process. Any illnesses or personal issues they encounter could also result in delays to your project, while work from other clients could see your app design fall by the wayside.
The cost of getting a freelancer to design your app depends on the rates of UI/UX designers in your country or the number of screens you want to get designed. Although they can be a cost-effective solution if you want to design a small app, the cost of designing your app with freelancers can quickly rise up if you’re designing many screens.
Pros of hiring freelancers
- Plenty of options
- Cost-effective for small projects
Cons of hiring freelancers
- Lack of communication
- High risk of inconsistency
- High costs for bigger apps
- Risk of project delays
Route #2 - Hire an in-house design team
If you’re an entrepreneur or a small business, it's a bad idea to hire full-time team members to design your app, mainly because of the costs involved.
But if you’re a larger organisation, an in-house design team gives you more control over how your app looks and feels and ensures that it’s consistent with your brand guidelines.
You can also communicate with them regularly and have clarity on how your project is progressing. At least in theory.
The cost of hiring an in-house design team is more expensive than any other route as it involves paying full-time salaries. You should also account for the amount of upskilling designers need to do before they can be trusted with a project of this size and the fact that you’ll be competing for air time with your colleagues.
Pros of an in-house design team
- High control
- Immediate communication
- Consistent design
Cons of an in-house design team
- High costs
- Potentially long learning curve
Route #3 - Hire an external design agency
If you can’t find freelance designers who meet your requirements and don’t have the capacity to hire an in-house team, you’ve still got options. And one of them is to outsource your work to a design agency.
These organisations are more reliable than freelancers and have a range of experienced stakeholders who collaborate to design your app. That means you should be able to sit back and relax as they manage and deliver your project.
The biggest downside to working with a design agency is the cost, particularly when you’re billed hourly. There may also be a lack of visibility on how your project is progressing, while you could be charged extra for delays, even if they’re out of your control.
So, if you’re an entrepreneur or small business who wants to get online and start selling quickly, this probably isn’t the best option for you.
Pros of a design agency
- Expertise and experience
- Can deliver more complex projects
- Costs less than in-house team
Cons of a design agency
- Lack of visibility
- High costs
- Spiralling timelines
Route #4 - Use an app builder
App builders are professional agencies that not only design your app but also develop it.
App builders are a great option if you don’t have the technical skills to develop or design your app. They are the most flexible option, as they effectively cater to a range of use cases and budgets. Working with them, you’ll notice the elevated levels of agility, efficiency and quality of your app design.
You also won’t have to manage different teams for development and design as they can take care of the process from end to end.
If you only want to commit to an app design, though, you have the option, with many app builders offering standalone app prototyping services. This means you can get feedback on your app and collaborate with stakeholders without paying for a line of code.
Pros of an app builder
- Expertise and experience
- Take care of development and design
- Quick development
- Monthly payment option
Cons of an app builder
- Not ideal for complex app designs
Want to start your app project with us?
Book a demoSpeak with one of our product experts today.
By proceeding you agree to Builder.ai’s privacy policy and terms and conditions

4 design rules that ensure app success
Guardrails are important when designing an app. Here are four things you should keep in mind to ensure your project stays on track 👇
Rule #1 - Do your homework to find the best colours
The colours you use in your app define the moods and behaviour of your target users. Give your best shot by choosing colours that channel those corresponding emotions.
There’s a shared language of colour in our culture, and your end user expects consistency when it comes to certain shades. For instance, green means go and red means stop. Don’t confuse these expectations.
Moreover, If your user initiates an action, make sure they can see that the action has been initiated. You never want the user to think that taking an action has resulted in nothing.
Rule #2 - Embrace the white space
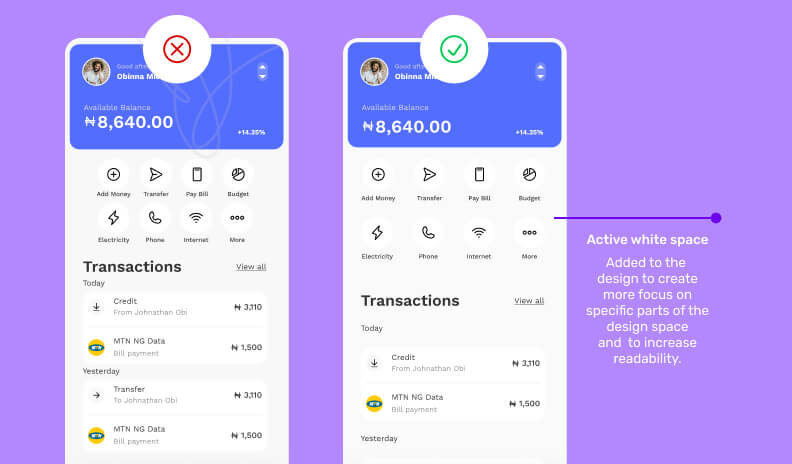
In mobile app design, clutter never works. This is graphic design 101, but you’d be surprised how many forget this.
You don't need to inundate the user with information or features. Negative space (aka white space) lets the user's mind work and absorb. And negative space doesn't mean bad. Instead, it allows users to focus on what they’re trying to achieve, rather than being overwhelmed and distracted.
Rule #3 - Minimise effort

To ensure the user experience is as seamless as possible, think about adopting elements that minimise the efforts of your users, such as search and filter options, a personalised homepage, post-purchase recommendations and autofill details for payments and addresses.
Meanwhile, make touch targets (the elements users interact with) large enough and easy to press so users seamlessly navigate through your app instead of being stopped dead in their tracks. Other features like one-time passwords or Face ID login will also prevent users from bouncing off before their journey has even started.
Rule #4 - Use mobile design patterns
What do the checkout process, splash screens, home screens, login screens and profile pages have in common?
They’re mobile design patterns. Or, in other words, they’re groups of design features that have become the expected standard. These are so important because as many as 42% of people uninstall an app because it was poorly designed or the experience was poor.
So don’t try to reinvent the wheel!
App designing tips and recommendations
Now let’s focus on practical design considerations. Some of them might seem obvious, but you’d be surprised how often they’re overlooked.
Tip #1 - Make it visually appealing
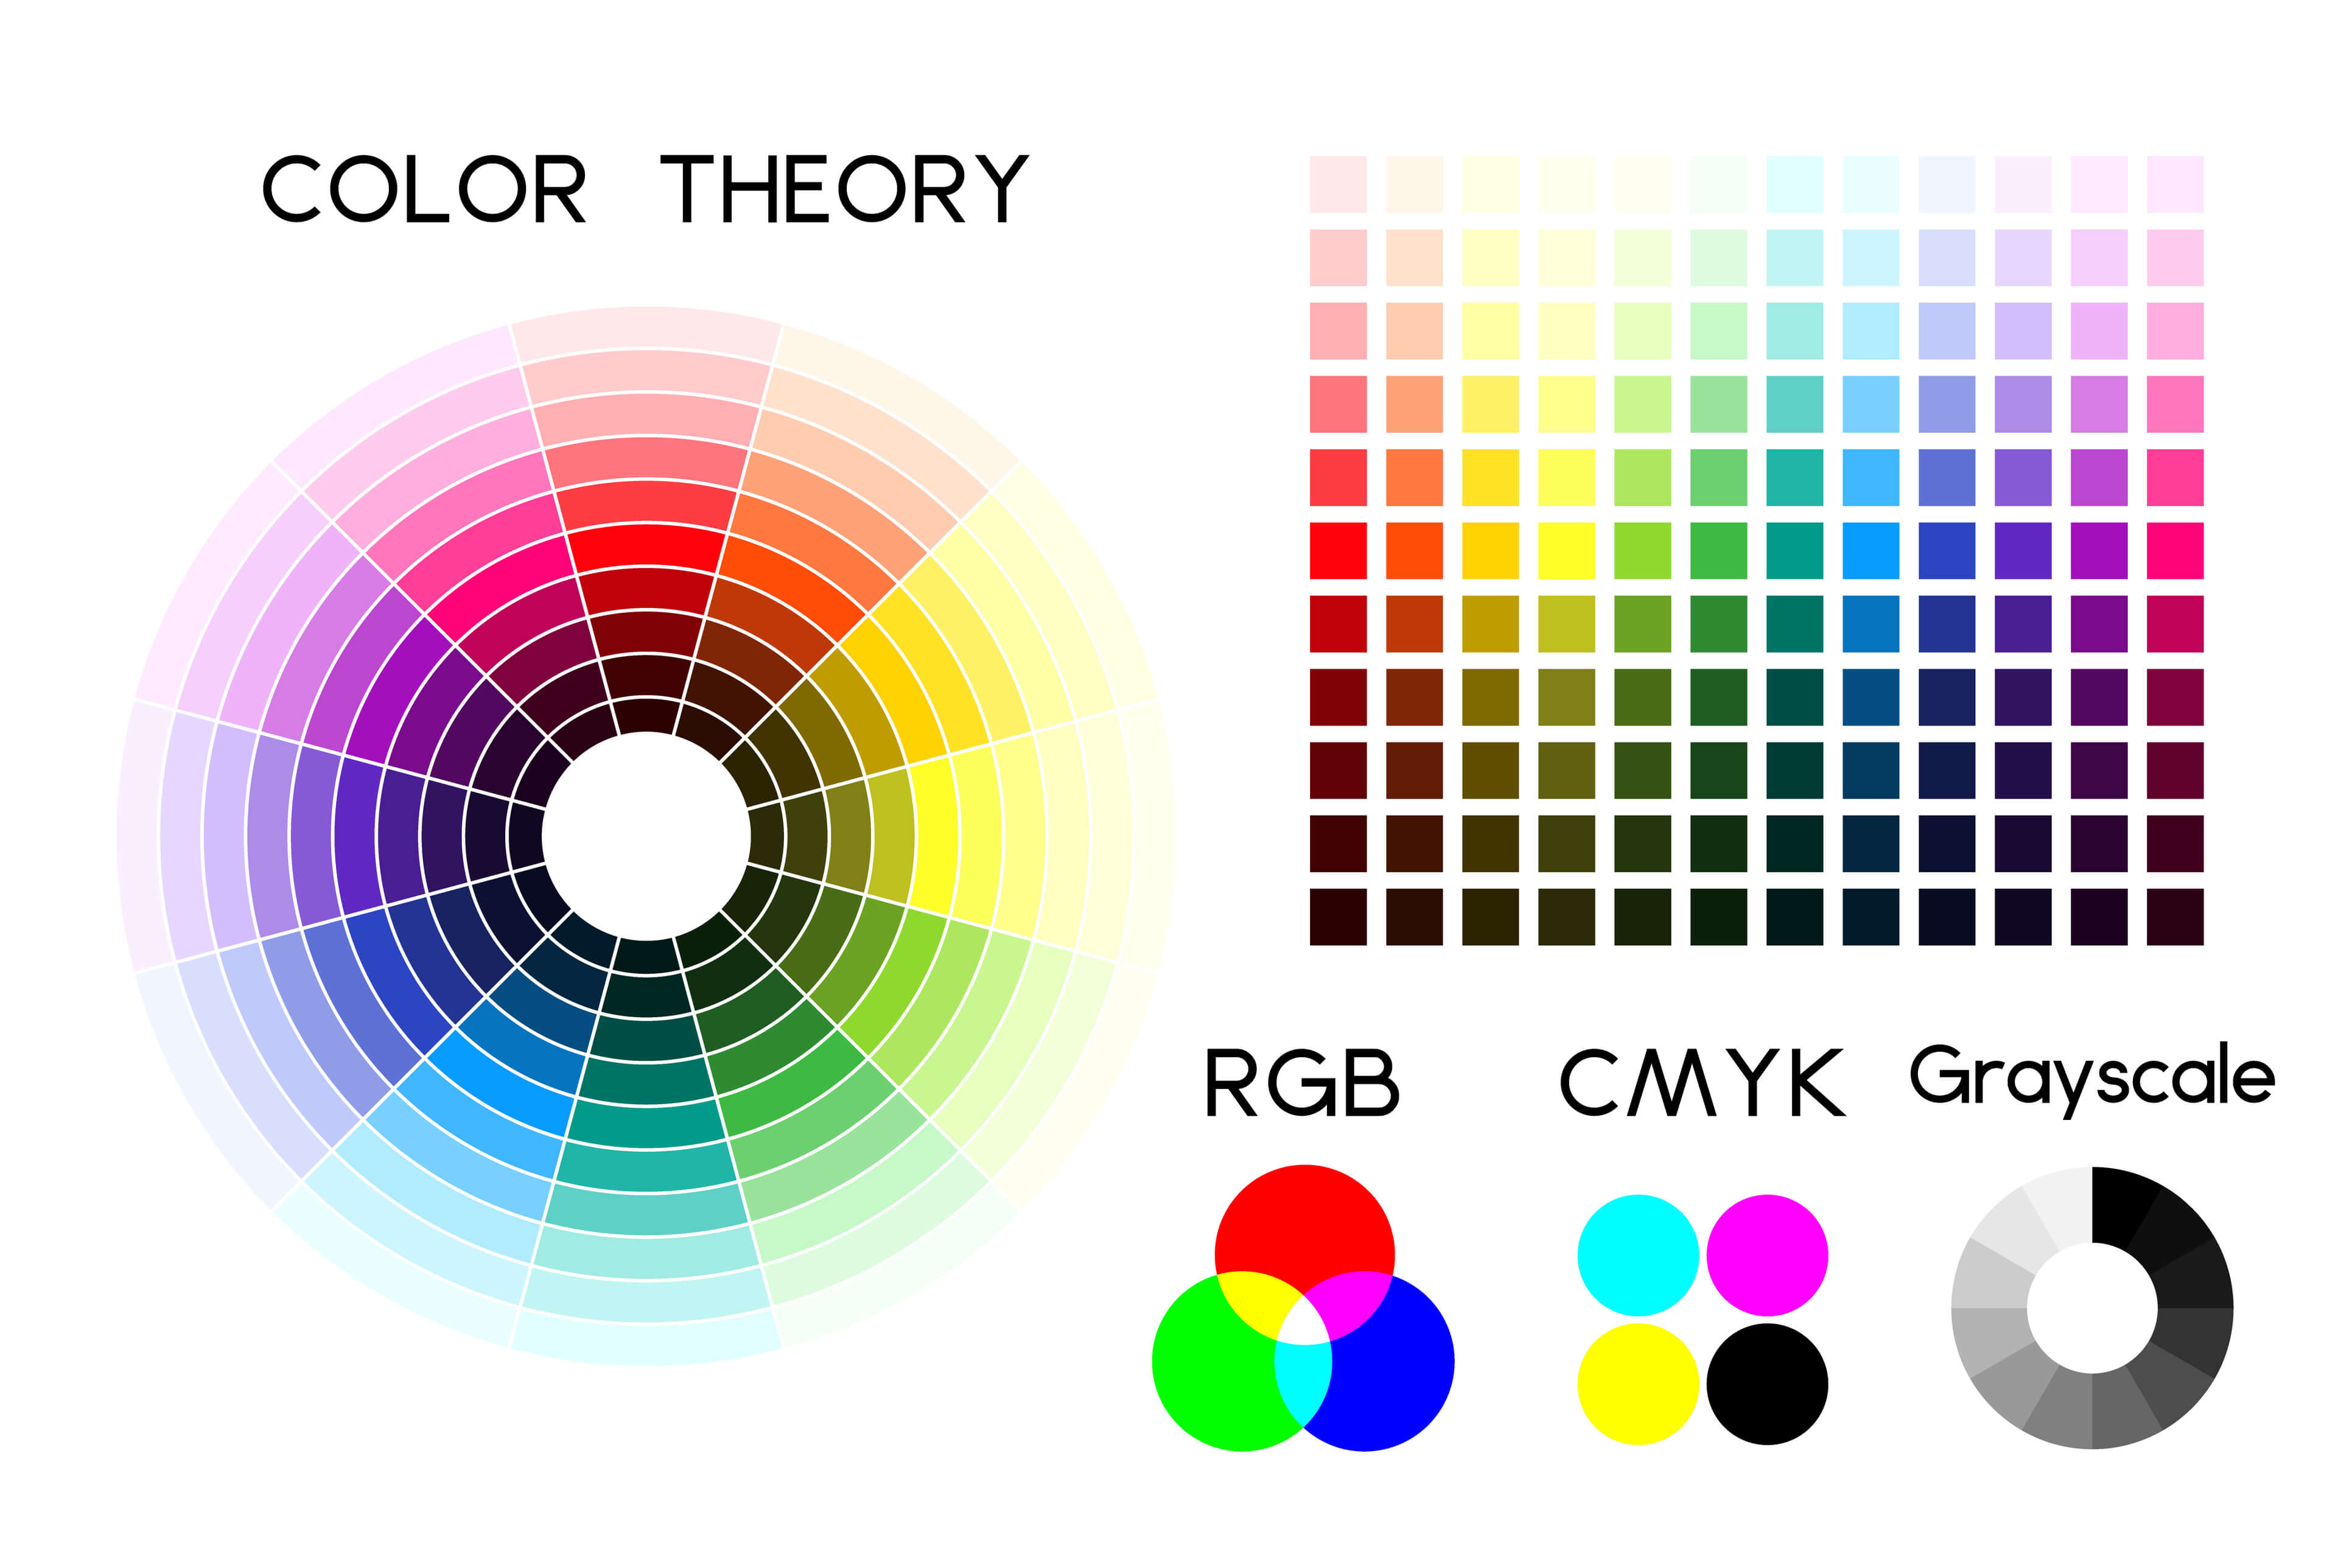
- Visual weight – use size, colour and shape to help direct users’ attention
- Colour wheel – quickly find colours that work well together
- Rule of thirds – Divide images into three boxes by drawing two vertical and horizontal lines; the crossover point is where we direct most attention
Tip #2 - Make it easy
- Feedback on input – if you’re asking a user for input, highlight incomplete fields in red. You can also specify the type of data a field requires; for example a currency field should only accept numbers. Anything that’s not a number should give the user feedback. Using both of these features lets users know if they’ve done something wrong
- Accessibility – always keep in mind how your design will appear to users with accessibility needs. For example, to accommodate users with colour blindness, don’t just make an incomplete box go red. Use visual indicators such as a tick or cross to highlight the field
- Help users find their way – give your users reference points that make it clear where they are within your app. This can be done with navigation menus and by using tactile feedback. An example of touch feedback is if a user scrolls too far, elements will get a little warped
Tip #3 - Built for humans
- Include a working back button – if users go through a series of steps, the back button should send them to the previous step, instead of back to the home screen
- Don’t bombard users with permission requests – instead, devise a strategy to get consent for requests like sending push notifications only after users get value out of your app
- Explain wait times – if something is loading, give a visual indicator like a loading bars or a skeleton screen to show progress
- Provide error messages – if a user sees an error message, it should contain information that helps them solve the problem or advise them on a next step
- Leverage feedback – before officially launching your app, consider running focus groups or beta testing to get feedback and improve your app design
Conclusion
App design is not something you can ace overnight. It’s a sophisticated process you need to get right before you develop your app, plus you also need to update it as and when you add new features.
And although you can achieve this yourself, an app design partner can make things easier. That’s where we come in.
When you create an app in Builder Studio 👈 you can instantly see how your app will look. All you need to do is by give your AI companion, Natasha, your brand colour, logo and website URL. She imports this information to give you an accurate preview of your app design.
Alternatively, if you only want a prototype of your app, you can use our prototyping tool, Builder Now. 👈
Hit the link that best fits your use case and get designing today!
Entrepreneurial senior management executive of fast growing technology businesses. Successful in taking ideas from concept to profitability, using a blend of lean, agile and rapid result methodologies. A background in building and managing cross-functional and hybrid teams, with a record for retaining talented individuals and delivering results. Skilled in developing and maintaining a clear product and project vision, strategy and roadmap. Willing and able to adapt to changing environments. Often named as a Crisis Manager with a vision to “Make Things Happen”.


 Facebook
 X
X LinkedIn
 YouTube
 Instagram
 RSS
RSS